Test equipment required for battery chargers
It does not require a lot of time to test and repair battery chargers, if the proper equipment and tools are available and the test procedures are understood.
Current Limiting Input Tester
Before testing any battery charger, plug it into a current limiting outlet to prevent blowing fuses in case of a short circuit. Such a current limiting input test set can be made by following the schematic wiring diagram shown in Figure 1-1.
CB1 is a 20 ampere manual reset circuit breaker of the fast acting type; F1 is a 20 ampere fuse; SW2 and SW4 are SPST toggle switches rated at 15 amperes at 115 volts each; the bulbs R2 and R3 are 250 watt, 115 volt infrared heat lamps (a single 550-600 watt cone type heating element can be used); R1 is a 100 watt, 115 volt light bulb; V is a 0-150 V.C.A. voltmeter; A is a 0-15 ampere ammeter; SW3 is an ammeter-shunting switch rated at 15 amperes at 115 volts, with normally closed contacts that must be held open to read the ammeter A. The outlet receptacle REC is a "U" grounded outlet for plugging in a charger A.C. cord, or for plugging in the test cord TC. The test cord TC is a 2-line cord with two small insulated alligator clips for testing transformers, timers and motors separately.
Switch SW2 is shown in the "in" position, which means that the high resistance lamp R1 only, or R1, R2 and R3 are in the circuit in parallel. The "out" position of switch SW2 means all resistance is shorted out of the circuit and full voltage is applied directly to the receptacle REC.
The switch SW4 is shown in the "H" position indicating that the high resistance lamp R1 is in the circuit only if switch SW2 is in the "in" position. The switch SW4 in the "L" position means that low resistance, consisting of lamps R1, R2, and R3 in parallel, is in the circuit, if switch SW2 is in the "in" position.
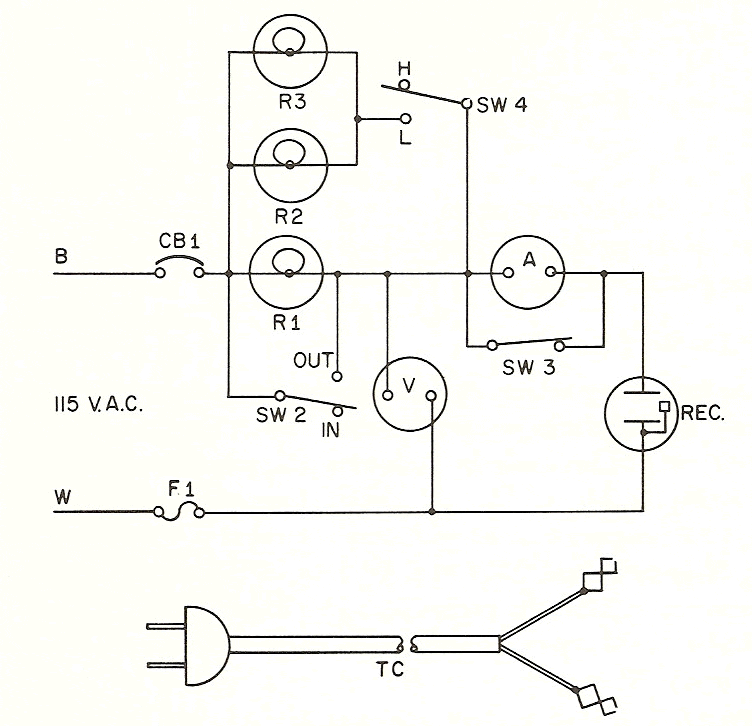
Before plugging the charger in the receptacle, set switch SW2 to the "in" position, and set switch SW4 either to the "H" position for testing small chargers, timers and motors or to the "L" position for testing larger chargers.
Plug in the charger but do not connect the D.C. cables to the battery, or allow them to touch each other. Turn the charger on, run through all of the rate and battery selector positions and watch the voltmeter V. The voltage will drop to zero or near zero if there is a short circuit
anywhere in the primary or secondary circuit. If the voltage doesn't drop at all, there is an open circuit in the primary circuit or line cord. If there are no shorts or opens, the voltmeter will read anywhere below the line voltage to as low as 30 volts for the larger chargers that have a normal primary current of 10 to 15 amperes.
If there are no shorts, set switch SW2 to the "out" position, connect the battery cables to the battery, and proceed to test the charger. To read the amperes input to the charger, press switch SW3 and read the ammeter A.
The circuit of Figure 1-1 can be assembled and mounted on a "bread board" panel or built into a well-ventilated metal cabinet. All of the parts are readily available locally, from electrical supply houses.
This input tester can be connected to the A.C. line continuously to monitor the line voltage if desired.
Volt-Ohmmeter
A volt-ohmmeter is an essential piece of equipment, but need not be as elaborate or as sensitive as required for radio or TV service. However, it should be as accurate as possible. The important ranges should include:
- D.C. Volts 2,5-10-50-250
- A.C. Volts 2,5-10-50-250-1000
- Ohms 1-10-100-10K-100K
A volt-ohmmeter that meets these requirements is the Simpson 260 Series 5, available from many electrical supply stores.
Capacitor Analyzer
A capacitor or condenser analyzer is valuable for testing a large variety of capacitors and condensers used in battery charger circuits. It should be able to test oil and paper condensers and electrolytic capacitors for actual mfd value, leakage, and power factor. The important ranges should include oil and paper condensers 0.001-100 mfd and electrolytic capacitors 1-1000 mfd. These analyzers are readily available in kit or wired form from various electrical supply stores.
Rectifier and Diode Tester
A rectifier and diode tester is a big time saver. There is no known tester available that will test both heavy current diodes and rectifiers as well as small low current diodes, or that will indicate polarity of rectifiers, diodes and transistors. For heavy current rectifiers, a heavy-duty unit is available at electrical supply stores or can be purchased from auto supply houses as alternator diode testers.
A good rectifier and diode tester can be made from readily available materials by following the details of Figure 1-2. This tester will test all rectifiers and diodes, as well as power transistors, for opens, shorts, conductivity, and polarity, and will test the polarity and condition of other low current solid state devices rated at 40 m.a. or over. The main rectifiers in battery chargers can, in most cases, be tested for conductivity, shorts and opens while connected in the circuit without disconnecting the transformer. Other small diodes and transistors may have to be disconnected for testing.
In Figure 1-2, the transformer T1 can be any battery charger transformer with a tapped secondary able to charge at a 6 ampere rate on 6 or 12 volts. The primary 6 volt tap and the common tap are used as the two outside leads. Switch SW1 is a SPST on-off toggle switch rated at 3-6 ampere at 115 volts; switch SW2 is a 3 contact rotary switch rated at 6 amperes at 115 volts for calibrating the two meter ranges: position H to calibrate rectifiers and diodes rated over 5 amperes, and position L to calibrate rectifiers and diodes rated under 5 amperes. Position T is for testing conductivity through prods PR3 and PR4; switch SW3 is a DPDT switch with no off position rated at 6 amperes at 115 volts that is used to select the high and low current ranges: L position is for rectifiers rated under 5 amperes drawing about 100 m.a. current, and position H is for rectifiers rated over 5 amperes and drawing about 5 amperes. Potentiometer R1 is a 100 ohm, 2 watt wire wound resistor with a linear taper at the low range under 5 amperes. Potentiometer R2 is a 2 ohm, 50 watt wire wound resistor with a linear taper for calibrating the high range above 5 amperes. Potentiometer R3 is a 25 ohm, 1 watt wire wound linear taper resistor for calibrating both ranges. Resistor R4 is a 20 ohm, 1 watt fixed resistor.
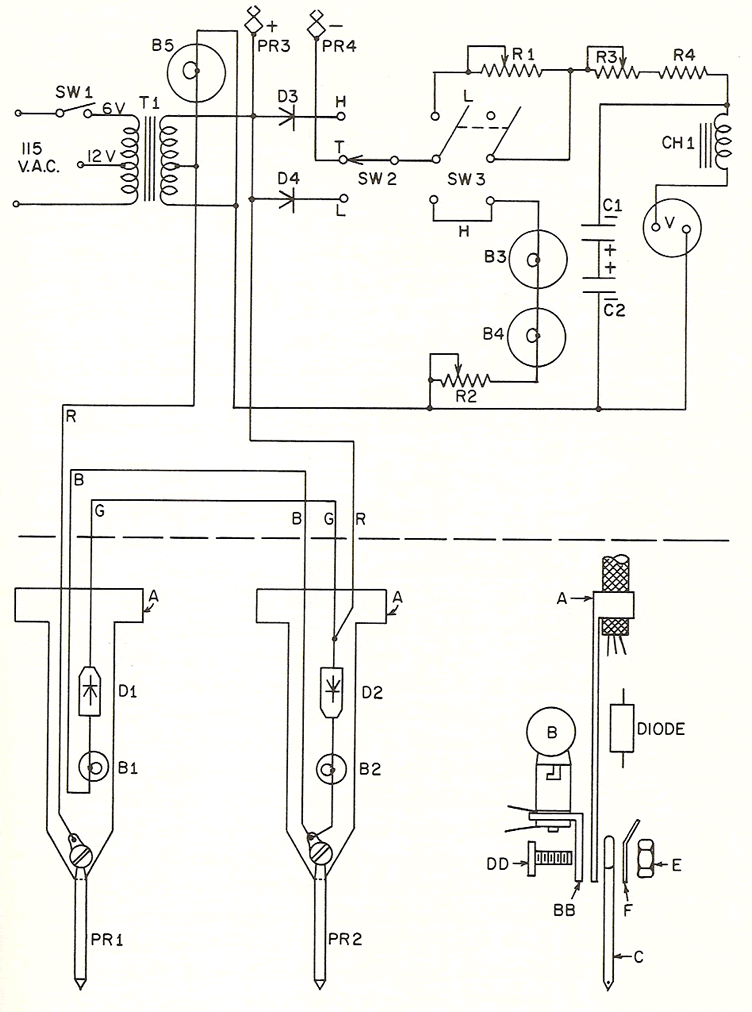
Meter V is an expanded range 6 volt voltmeter. Any 6 volt battery tester voltmeter can be used if resistors R1, R3, and R4 are correct for the substitute meter. An expanded range voltmeter gives the accurate readings needed to find the rectifiers with only 80% conductivity since they are useless in battery chargers. Capacitors C1 and C2 are each 100 mfd, 25 volt electrolytic capacitors connected back to back as a non-polarized unit, if a rectifier under test is connected for reverse polarity. Choke CH1 is a 7 ohm primary transformer winding taken from a 6 volt, 4 ampere charger. Choke CH1 and capacitors C1 and C2 filter the rectifier output, holding the meter needle steady. Bulbs B3 and B4 are number 2330 6-8 volt auto headlight bulbs with their filaments connected in series. These bulbs have a flange which can be used for mounting and connecting the two bulbs together, while the filaments in each bulb are connected together by soldering the lead across both terminals. Diode D4 is a silicon diode used for loads under 5 amperes and can be any small diode with a rating of 750 m.a., 200 PIV. Diode D3 is a diode for loads over 5 amperes and can be any 35 ampere, 50 PIV silicon diode, such as Motorola IN1183. Pilot light B5 is a No. 53 bulb, or any 12-14 volt bulb.
The leads to each of the test prods PR3 and PR4 should be about 4 or 5 feet long, or long enough to reach from the test bench to the battery charger under test, and may terminate in alligator clips or pointed prods. Test prods PR3 and PR4 are used for conductivity and quality tests on all rectifiers and diodes used in battery charger circuits. Although they will indicate polarity, shorts and opens, prods PRI and PR2 are better for determining all these conditions except quality and are used first in testing rectifiers and diodes. Prods PR1 and PR2 are mechanically the same but are wired differently as shown in Figure 1-2. Diodes D1 and D2 are both the same as D4. Bulbs B1 and B2 are both No. 53 type lamps. Sockets BB are alike and are single contact miniature bayonet with offset bracket insulated from both terminals. A copper sheet cut as shown as part A has two tabs on one end that fold over as a cable clamp, and a hole drilled in the opposite end. Part C is a No. 12 copper wire ground to a point on one end and an eyeloop formed on the other end for mounting. Parts A, BB, C, and solder terminal F are held together by a 6-32 X ⅜ inch machine screw DD and a 6-32 nut E. After complete assembly and test, wrap the whole prod with plastic electrical insulating tape except the glass part of the bulb for viewing. The three-wire, extra
flexible cable connecting the two prods PR1 and PR2 to each other and to the tester shows a black B, green G, and a red R color coded cable.
When using the rectifier tester, prods PR1 and PR2 are used to determine the polarity and to indicate shorts or opens in rectifiers, diodes and transistors. These prods will show whether or not the diodes or rectifiers are working but not how well they conduct. When prods PR1 and PR2 are placed across any rectifier, diode or transistor section capable of carrying 40 m.a. or more, regardless of how the prods are connected to the terminals of the unit being tested, only the bulb B1 or B2 associated with the prod on the anode of the unit will glow indicating rectifier action. If neither bulb glows the unit is an open circuit. If both bulbs glow, the unit is shorted. If both bulbs glow unevenly there is some shunt leakage, such as occurs during "in circuit" testing, or the rectifier under test has almost as low a backward resistance as forward resistance which is reason enough to reject the unit. If the unit being tested is shorted or open, do not continue to test for conductivity with prods PR3 and PR4.
Prods PR3 and PR4 test rectifiers, diodes and power transistors capable of carrying 100 m.a. or over for conductivity and quality, also confirm shorts or opens.
Initially, and periodically afterward, it is necessary to calibrate meter V to the built-in calibration standards of diodes D3 and D4. To calibrate, plug in line cord of tester and close switch SW1; set SW2 and SW3 to position L; set potentiometer R3 in mid range, and adjust potentiometer R1 until meter V reads at the far right edge in the green "SAFE" scale under "CHARGE." Ignore the two upper scales "LOAD TEST" and "GEN REGUL." If unable to reach this point, adjust both R3 and R1 until it is reached. Bulbs B3 and B4 do not glow on this setting. Next, turn switch SW2 and switch SW3 to H position (bulbs B3 and B4 should glow) and adjust R2 until the meter V reads at the far right edge of the green "SAFE" area. It may be necessary to repeat these two adjustments, readjusting R1, R2, and R3 accordingly, until the meter reads the same on both ranges. No diode or rectifier tested should exceed this point if diodes D3 and D4 are up to standard. All good rectifiers, even the older low conductivity selenium rectifiers, should fall well within the "SAFE" range. Border line cases can be decided by giving the charger an output load test.
After the meter is calibrated, the following test procedure should be done. First, use prods PR1 and PR2 to test for opens, shorts, and polarity. If there are no opens or shorts, the bulb in either prod PR1 or prod PR2 will glow, indicating the anode. The red test prod PR3 should be connected to the anode terminal, and the black prod PR4 should be connected to the cathode terminal. Set switch SW3 to either H for over 5 amperes rating, or to L for under 5 amperes rating, and set switch SW2 to test position T. Turn on switch SW1, and the meter should read in the green "SAFE" area if the unit is acceptable. On the H position of SW3, a shorted unit will cause both bulbs B3 and B4 to increase in brilliancy. Be sure the polarity is correct. A reversed connection would show no reading on the meter.
Do not leave the tester on or connected for calibration or testing any longer than is necessary to obtain a reading.
This tester can be used to test power transistors only on the low range L below 5 amperes which draws 100 m.a. current.
Prods PR3 and PR4 draw a current through the rectifier of 5 amperes on the H range and 100 m.a. on the L range. Prods PR1 and PR2 draw a 40 m.a. current through the rectifier.
Battery Charger Load Tester and D.C. Welder
Every battery charger output should be tested, under load, for the correct rated output at rated line voltage.
A good load tester, which can be purchased from electrical supply houses, can test all batteries from 2 to 40 volts and, when used with batteries, can discharge or hold the batteries at the desired voltage. It uses a carbon pile rheostat to adjust the load to any desired value, using its 3 range voltmeter and ammeter. Any battery load tester can be used but they are usually limited to 6 and 12 volts.
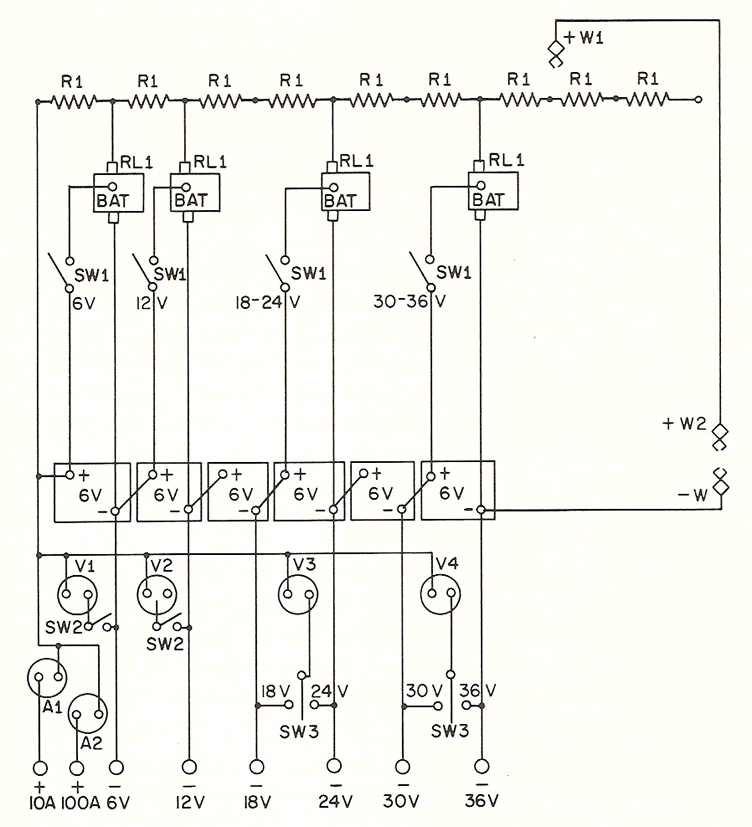
A load tester can be built to load test at various voltage levels using the schematic shown in Figure 1-3. The most useful load test voltages are 6, 12, 18, 24, 30 and 36. If only 6 and 12 volt units are tested, the other sections can be eliminated, or more added if higher voltages are required. The six 6 volt batteries shown should all be the same and can be any automotive 6 volt lead-acid battery which need not be heavy duty because they will last for years in this service if kept charged. Larger batteries are required for industrial chargers having an output of over 100 amperes. These batteries will usually be kept charged by the process of testing chargers. However, they should be equalized occasionally by charging them often enough to keep the electrolyte up to full charge in all cells. A simple charger can be made using a transformer and rectifier from a 36 volt charger, adding any refinements desired.
Resistors R1 are identical 6 volt battery test load resistors used in commercial battery load testers. They can be purchased as a new repair part, salvaged from old junked testers, or they can be made using the construction details of Figures 1-4 and 1-5. Make all sections the same as section A-B, that is, 12 feet of 5 strands of 0.0625 inch baling wire wound on an asbestos board, winding on additional sections if used for welding as explained later. Solenoids RL1 are the same and are standard 6 volt automotive intermittent duty starting solenoids having a single small terminal be tween the large studs and connected to one end of the coil. The other end of the coil is connected internally to the "BAT" terminal. The contacts to the large studs are normally open, but close when the coil is energized. Switches SW1 are the same and are momentary contact N.O. SPST push button switches. Switches SW2 are alike and are SPST rated at 1-3 amperes at 115 volts. Switches SW3 are identical SPDT switches with an off position. Switches SW2 and SW3 should always be turned off when not in use because the meters would put a small drain on the batteries. Meter A1 is a 0-10 ampere D.C. ammeter. Meter A2 is a 0-100 ampere D.C. ammeter. Meter V1 is a 0-8 volt D.C. voltmeter for 6 volt chargers; meter V2 is a 0-15 volt D.C. voltmeter for 12 volt chargers; meter V3 is a 0-30 volt D.C. voltmeter and is switched for reading either 18 or 24 volts; meter V4 is a 0-50 volt D.C. voltmeter that can be switched for reading either 30 or 36 volts. Voltmeters V1, V2, V3 and V4 should be accurate. If they are not accurate, they can be recalibrated for a single voltage by setting the zero adjustment if accessible on the face of the meter. Otherwise, the voltmeter can be calibrated by using a rheostat in series with the meter to reduce the reading if it is high, or a rheostat in parallel with the meter internal multiplier resistance to increase the reading. If an accurate standard is unavailable, calibrate the meter using a good fully charged lead-acid battery at normal room temperature of about 77 deg. F that has lost its surface charge, such as 24 hours after fully charging using a value of 2.1 volts per cell. The test terminals from the batteries extend to a convenient place on the front of the bench and are marked as shown. The negative terminals are painted black and marked "NEG" or are left plain. The wo positive terminals are painted red or marked "POS." A rubber curtain, such as a piece of old inner tube, should be hung over the terminals to prevent accidental shorts, and removed when the load tester is used. Make the test terminals using a piece of copper tubing about 3 inches long that has been soldered or crimped on the ends of the cables and flattened with a hole drilled for securing. Then, bend them outward away from the bench to take the charger clamp.
To use the load tester, connect the battery charger positive or red clamp on the proper positive test terminal. For small chargers under 10 amperes, use terminal positive 10 A., and for chargers above 10 amperes, use terminal positive 100 A. The negative battery charger clamp is connected to the correct voltage negative test terminal, such as 6, 12, 18, 24, 30 or 36.
Set the correct voltmeter switch SW2 or SW3 to match the voltage of the charger being tested. Plug in the charger A.C. cord, turn it on to charge, and note the ammeter reading on both the charger and on the test panel. They should read about the same. However, on many battery chargers, the ammeters usually read on the high side. That is, they show more amperes than the charger is actually putting out, which is safer than if the reading is too low. If the charger is putting out its full rated output on the highest setting and the D.C. voltmeter reads nominal voltage or higher, and if the line voltage is normal, the charger has full output.
If the D.C. current is not up to its rated output, the battery voltage has probably risen above its nominal value. Press the proper switch SW1 for the voltage of the battery to put a load on the battery and charger. Hold in switch SW1 until the D.C. voltmeter reads exactly the nominal voltage, such as 6, 12, 18, 24, 30 or 36. Then, quickly read the D.C. ammeter on the tester and charger. It may be necessary to turn off the charger and discharge the battery for 20 seconds to bring the battery voltage down.
The procedure is the same when using a ready-built load tester. Connect the tester clamps and the charger clamps to the battery, and apply the correct number of discharge load resistors.
The load tester is used to reduce the battery voltage to its nominal value. A charger will produce rated amperes only on a fully discharged battery having a voltage at or below its nominal rating. As the battery is charged on most constant voltage chargers, its voltage increases and the amperes decrease, so the load resistance discharges the battery and helps to hold it down during testing.
A single resistance load tester is not practical in a repair shop because of the large variety of chargers tested. However, once the volt amperes across a given resistance have been established, it is an accurate indication of the full output of the charger. Charging batteries is different from applying a voltage across a resistance only. The charger
must first overcome the back EMF or counter voltage of the battery before it can deliver any charging
current. After the charger reaches the nominal dead battery voltage, the current drawn by the battery is determined by the internal resistance of the battery. This resistance consists of the battery plates, straps, electrolyte and is a very low value in fractions of an ohm. That is why the conductivity of the rectifiers, and the line voltage are quite critical for full output of the charger.
The load tester shown in Figure 1-3 also makes an ideal D.C. welder for metallic arc welding, straight and reverse polarity, arc torch brazing, heavy soldering and heating. The voltage dropping resistor consists of all of the load resistors R1 plus additional sections. Only 3 are shown. Clip pos. W1 is connected to one of the junctions between any two of the resistors R1, and the pos. W2 clip is the positive welding electrode holder, or carbon arc torch. Clip neg. W is the negative welding connection. This arrangement will handle the occasional welding, brazing, or heavy soldering encountered in battery charger service.
Heavy Duty Adjustable Resistance Board
A heavy duty adjustable resistance board can be used, not only as a more flexible load tester and battery discharge resistor at all voltages, but also for many other purposes in battery charger service.
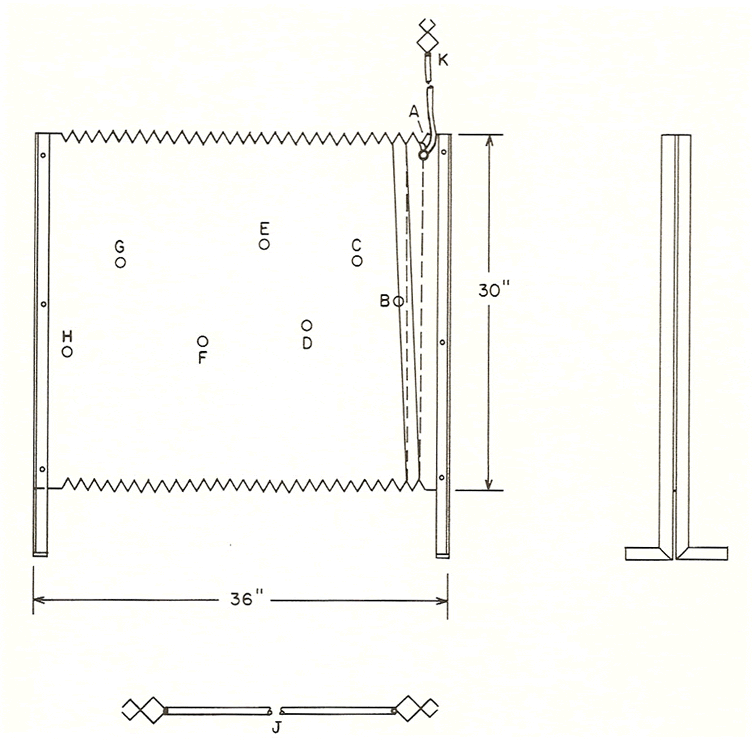
Make a resistor board as shown in Figures 1-4 and 1-5. With the cable and clip K and the jumper wire J, any load resistance can be selected to reduce or hold the battery voltage at any desired value. If desired, a heavy duty carbon pile rheostat can be connected in series to give a fine control, and a long coil of heavy nichrome heater wire can be added at junction H to give additional higher resistance. A solenoid, or foot operated automobile starter switch, can be used in series to connect or disconnect the load resistor quickly and conveniently.
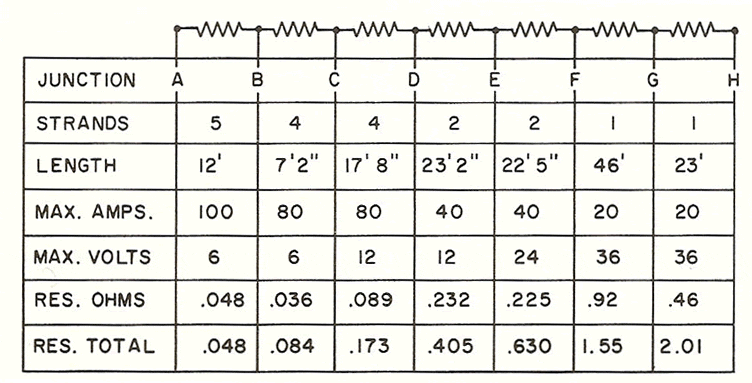
The test board shown in Figure 1-5 is wound using iron baling wire having a diameter of 0.0625". The number of strands and length of each section are shown in Figure 1-4. These strands are twisted, after measuring and cutting to length, by fastening one end in a vise and the other ends to the spokes of a wheel. By spinning the wheel, the strands are twisted tightly.
The board is asbestos ¼ inch thick and 36 inches long by 30 inches wide, clamped on each end by bolts inserted through 1" X 1" X ⅛" angle iron as shown. If this is to be used on an inflammable floor, such as wood, prepare a sheet metal pan and place it under the feet of the board to catch any sparks or molten metal in case of an accidental wrong con nection. Cut notches, using a hack saw, in the edges on the top and bottom on 1 inch centers to keep the wires separated and in position. At each junction twist the wires together, bring them out at right angles to the board, and braze or solder the ends together to make good electrical contact. Junctions that occur on the back side of the board such as C and F, can be brought out to the front through a drilled hole in the board. Each junction should be secured by wire through small holes drilled in the board. Insulate any close wires using asbestos paper. Intermediate taps can be brought out after the board is completed by using two piece copper connectors such as those used by electricians.
Figure 1-4 shows the maximum amperes, approximate resistance in ohms for each section, and also the total voltage and resistance from junction A to each successive junction.
To use the board, connect lead K to one side of the battery and charger, and connect jumper J between the other side of the battery and charger, and to the appropriate junction to give the desired load.
After some experience, the board can be calibrated for testing any charger without batteries. The voltage and/or the amperes output will be lower than when connected across a battery. Make up a chart for each model known to have full output on a battery by selecting a junction that will give approximately the full rated amperes and record the exact amperage, voltage and junction used, as well as the line voltage when the test board is cold at start. The D.C. voltage will be considerably below the nominal voltage. To test the same models, or a similar model having the same rating, using only the resistance board and no battery, the readings should be approximately the same. Remember that the resistance will rise and the current will drop as the resistance board heats up. A quick cold start test each time should produce the same readings.
Figure 1-4 shows the maximum voltage to apply between junction A and the other junctions. However, a lower voltage applied between junction A and a higher junction will draw a lower current. For example, 6 volts between junction A and F would draw approximately 10 amperes (0.630 ohms).
This board can be used for other purposes also such as the voltage dropping resistor shown in testing voltage regulators in Figure 1-6, resistor R1.

The test resistance board can be used to determine the correct resistance of ballast or voltage dropping resistors used in primary or secondary circuits of battery chargers when connecting or converting old style 6 volt only chargers to 6/12 volt operation or to reduce the output in some cases. After determining which junctions give the proper value, check the resistance accurately on a low range ohmmeter or wheatstone bridge. For low values, calculate the resistance using Ohm's law after reading the amperes and the voltage drop across the resistor section. The resistance in ohms equals the voltage drop divided by the current in amperes. For example, with 10 amperes through the resistor and a voltage drop across the resistor of 6 volts, the resistance is six tenths or 0.6 ohms. The wattage rating of the resistor should be at least the current multiplied by itself times the resistance or a value of 10 X 10 X 0.6 equals 60 watts.
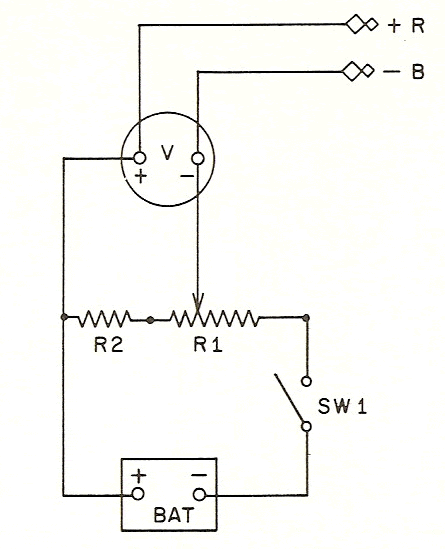
Charger-Powered Voltage Regulator Test Set
To properly and quickly adjust and check automatic voltage regulators in battery chargers, a variable D.C. voltage and an accurate D.C. voltmeter are needed. A test set using voltage from the battery charger, instead of an external source of voltage, is shown in Figure 1-6.
In Figure 1-6a, potentiometer R2 is a 1K ohm, 10 watt wire wound unit. Terminals T1, T2 and T3 are small alligator clips attached to leads about 2 feet long. F is a 1/10 (0.1) ampere fuse. V is a D.C. voltmeter having a range suitable for the voltage of the battery, wired as shown.
To use the test set, disconnect the positive lead from the positive terminal of the voltage regulator and connect it to clip T1. Then, connect clip T3 to the positive terminal of the voltage regulator. Connect clip T2 to the negative lead and terminal, which is still connected to the voltage regulator. Connect the charger, turn it on and adjust potentiometer R2 until the correct cut-off voltage is reached. Readjust the voltage regulator if necessary.
If the battery voltage is not high enough to reach the cut-off point, the voltage of the charger at clips T1 and T2 can be increased above the battery voltage to speed up the adjustment by inserting a resistance R1 Figure 1-6b between the positive terminal of the battery BAT and positive battery clip CH of the charger. Resistor R1 can be an old steel spring having a wire gauge of No. 14 or larger depending on the current, ¾’’ in diameter and 2 feet long, or a series of old tester discharge resistors. Better yet is the resistor board shown in Figure 1-4 and 1-5. Use a resistance value that will allow the charger voltage to rise slightly above the desired cut-off voltage of the regulator.
Self-Contained, Battery-Powered Voltage Regulator Test Set
A self-contained, battery-powered voltage regulator test set that is ready-built and available from electrical supply houses is shown schematically in Figure 1-7.
V is a D.C. voltmeter with a full scale of 50 volts and a resistance of 50K ohms or 1K ohms per volt. Switch SW1 is a N.O. momentary contact switch that is closed for "test" and open for use as a separate voltmeter, BAT is a 67.5 volt "B" battery. R1 is a 10K ohm potentiometer and R2 is a 3K ohm resistor. The tester also has a built-in thermometer calibrated in cut-off voltage.
The voltmeter on this test set, due to the high potentiometer resistance, will drop suddenly when the zener diode voltage of the voltage regulator is reached. If it drops below the cut-on voltage of the regulator, increase the voltage by turning potentiometer R1 clockwise until the cut-off voltage is again reached. Then, turn the voltage down slowly to check the cut-on voltage, if so equipped, of the voltage regulator.
In the absence of more specific voltage regulator settings, use Table 1-1 as a guide. When the gassing point of the battery is reached during charging, the battery terminal voltage at 77 deg. F should be about as shown in Table 1-1.
Voltage Regulator Cut-Off Voltage for Various Batteries

A.C. Powered Voltage Regulator Test Set
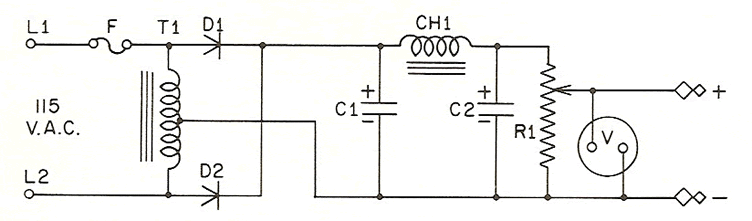
An A.C. powered voltage regulator test set is shown in Figure 1-8.
Transformer T1 can be a 120 or 240 volt section of a small transformer with a center tap so it acts as an auto-transformer. Also either the primary or secondary section of an old radio power transformer can be used if it is center tapped. Diodes D1 and D2 are silicon diodes rated at 1 to 2 ampere at 200-400 PIV. The rectifier output must be filtered; otherwise, the peak rectified voltage would give a false trigger voltage. Normally, with the regulator connected to the charger, the battery acts as a large capacitor holding down most of these voltage peaks. Choke CH1 is a 30 henry choke. Capacitors C1 and C2 can be 8-16 mfd, 200 DCWV electrolytic capacitors. R1 is a 1K ohm, 10 watt wire wound potentiometer. F is a ¼ ampere fuse. Meter V is a 0-50 volt D.C. voltmeter. This circuit gives about 0-70 volts D.C. output. The auto-transformer can be a shock hazard. An isolation transformer with primary and secondary windings would be preferable for this reason if it has a 120 volt center-tapped secondary (60 volts either side of center tap).
Another method would be to use a bridge circuit in the rectifier section with an input voltage of 60 volts from a Variac or other variable voltage source.
When using any test set that has an internal battery or a filtered rectifier circuit supplying the voltage, such as is shown in Figures 1-7 and 1-8, it is necessary to make a final adjustment after connecting the regulator to the charger because the charger output is not completely filtered except for battery voltage. Peaks of rectified voltage will trigger the regulator at a voltmeter reading below that set at a steady D.C. It will be necessary to increase the cut-off voltage adjustment. The cut-on voltage, however, should not need readjustment because the charger is off, and the battery alone is supplying the voltage.
By using the test set shown in Figure 1-6, this final adjustment is not usually necessary. However, it should be checked when the voltage regulator is reconnected to the charger output for normal operation.
Converter To Change Single-Phase To Three-Phase Power
If shop repair of large industrial chargers is attempted and a three phase power supply is not available, a relatively inexpensive converter can be built using any three phase electric motor in good condition, as shown in Figure 1-9, providing 230 volt single phase power is available. This converter will handle all 230 volt, three phase chargers and motor generator sets, but not 440 volts, three phase. This could be done however, by using a 10-15 KVA single phase transformer to step up the voltage from 230 to 440 volts and by adapting the motor to 440 volt operation.
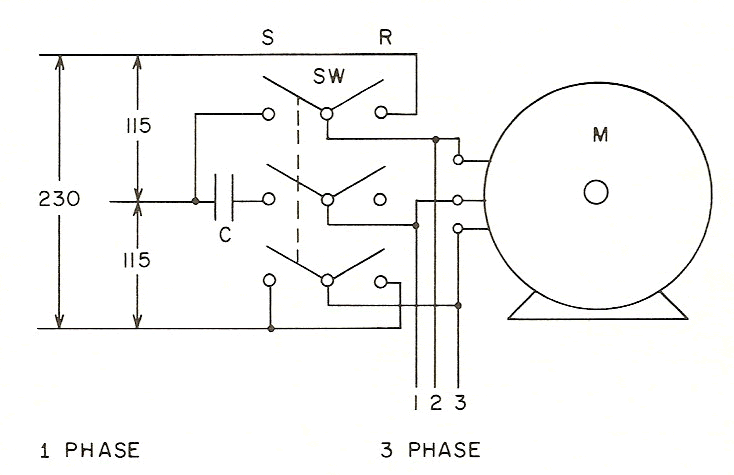
In Figure 1-9 the motor M is a 230 volt, three phase induction motor rated at 10-15 H.P. Switch SW is a 3PDT knife switch with an inter-lock to prevent setting it to the run R position until after it has been set to the start S position. Switch SW can be made up of two separate 3PST switches placed side by side with the handles facing each other, thus placing one switch upside down. Bolt the two handles together and the result is a 3PDT switch, but without an inter-lock.
Motor M is started on 115 volts single phase using a 500-700 mfd. 120 volt electrolytic motor-starting capacitor C. As the motor comes up to full speed, throw switch SW to the run R position, which connects the single-phase 230 volts across one phase of the motor M.
A three-phase motor running on single-phase voltage generates a three phase voltage at the terminals of the motor, due to the magnetic induction of the turning rotor in the A.C. field. Connect the three motor leads 1, 2 and 3 to an outlet or a disconnect switch for three-phase testing.
This converter can be made self-starting by using a motor starting relay, which is available from electric motor parts supply houses. Wiring instructions are usually included with the relay for this type of converter.
Such a motor makes an ideal heavy duty grinder, by belt-driving an arbor holding a 10 inch blacksmith grinding wheel. There is enough starting torque in the motor to bring the wheel up to speed, and the inertia of the wheel acts as a flywheel to assist the motor during sudden high current loads, such as starting a three-phase motor-generator set.
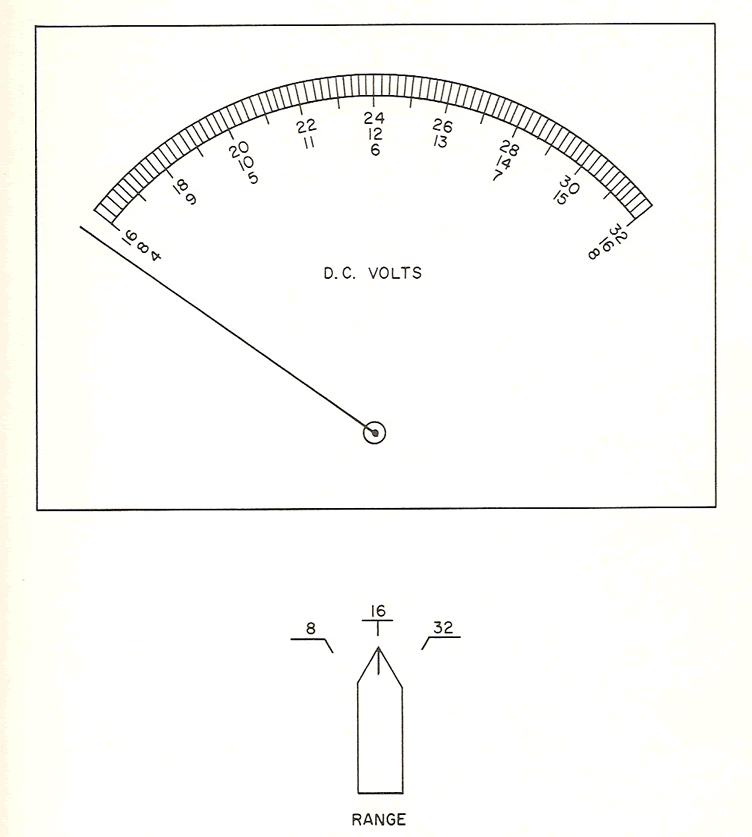
Precision D.C. Calibrating Voltmeter
Anyone engaged in the calibration of battery testers, and adjustment of voltage regulators needs an accurate D.C. voltmeter having ½% guaranteed accuracy, or better.
There are no standard meters on the market that have suitable ranges and accuracy at a reasonable cost to properly calibrate and adjust battery service equipment.
The author has written the specifications, and been instrumental in having developed, an ideal D.C. voltmeter designed specifically for the special needs of the battery service equipment industry.
Figure 1-10 shows the scale of a three range D.C. voltmeter designed for those who are concerned only with vehicle starting batteries having voltages of 6, 12, and 24 volts.
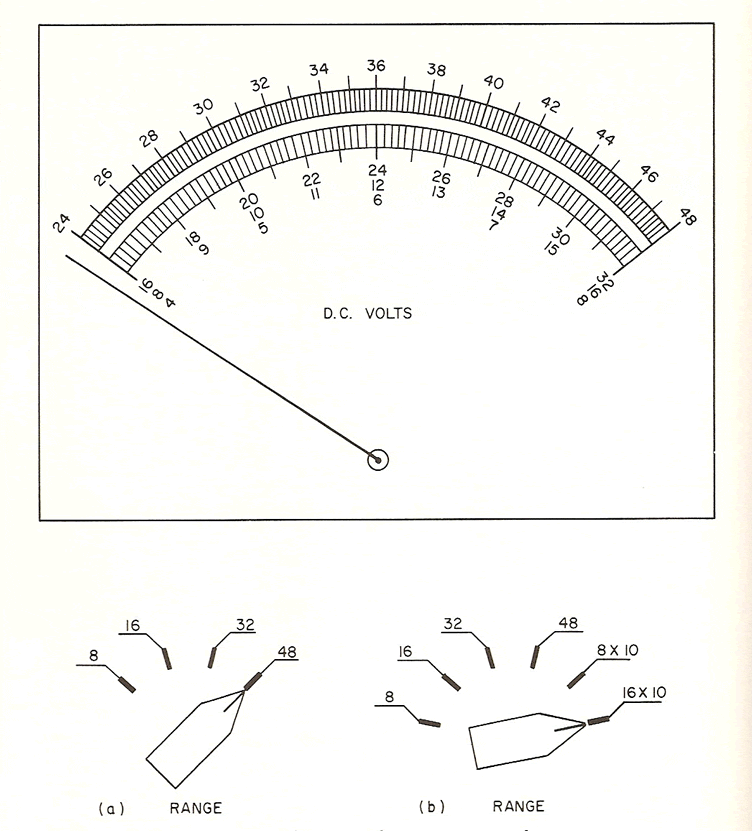
Figure 1-11 shows the scale of a two-arc D.C. voltmeter having four basic ranges for 6, 12, 24 and 36 volt batteries, covering all vehicle starting batteries plus golf cart and other 36 volt batteries. The range selector, covering these four ranges is shown in Figure 1-11a. Figure 1-11b shows two additional ranges of 8 X 10 (40 to 80 volts read on the 4-8 scale and multiplied by 10), and 16 X 10 (80 to 160 volts, read on the 8-16 scale and multiplied by 10), for those who work with all battery voltages likely to be encountered, or anticipated in the industrial and electric vehicle field.
Electric meters having an accuracy of 2% and above are manufactured using pre-printed dials, which are all the same. Precision meters of ½% accuracy, or better, require individual dials and calibration scales, drawn by hand. The cost to manufacture these meters to specifications is about the same as that of a comparable standard scale meter listed in meter catalogs.
Until these meters are available on the meter market, they can be made to order at a cost comparable to that of a less accurate jewel type meter.
Source 14 can furnish these meters shown in Figures 1-10, 1-11a, 1-11b and Table 1-2. Using only reliable, blank dial meter movements from such manufacturers as General Electric, Westinghouse, Weston, and others, they are equipped to make up accurately calibrated dials. Since they are familiar with the specifications, and they can quote a price if the Figure number and the preferred meter size are given. For example: when writing for a price, state, "Please quote price and delivery on the meter, specifications Table 1-2, drawing Figure 1-11b in 6½" meter size."
Specifications for Precision D.C. Calibrating Voltmeter for Battery Service Equipment

The price depends on the meter size, and whether it has one or two scale arcs. A meter with the additional ranges shown in Figure 1-11b (8X10 and 16X10) is only slightly more because only two precision multiplier resistors and two extra positions on the selector switch must be added.
The taut-band suspension meter is superior to and costs less than the jewel type because there are no bearings nor hair spring to cause friction. They are more rugged and reliable over a long period of time and readings are easily and accurately taken.
Some of our battery chargers