Meters and battery testers
The most common electric meters used in battery chargers are "charge rate" indicators (D.C. ammeters) either with or without an external shunt, and "bulb indicators," which are zero center D.C. ammeters with an external shunt. In combination battery chargers and battery testers, there may be an additional calibrated battery testing voltmeter. Also, there may be D.C. voltmeters, A.C. ammeters and A.C. voltmeters, or an ampere-hour meter.
D.C. Ammeters
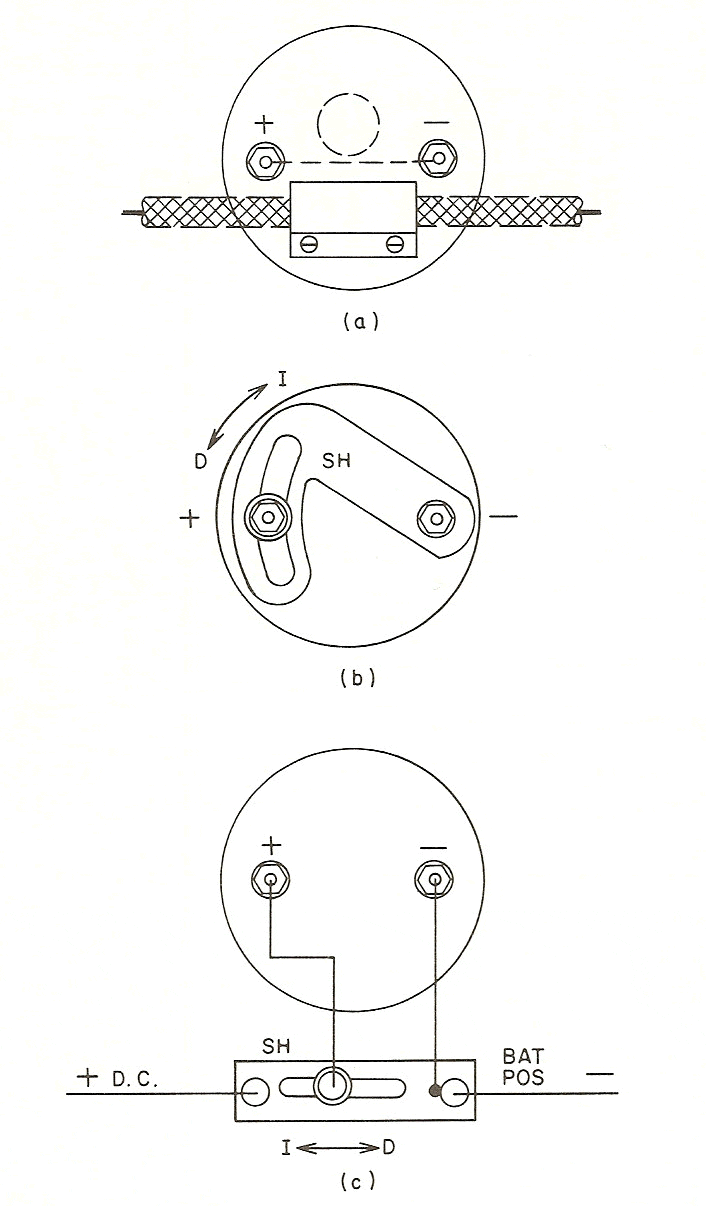
Three types of ammeters are used on battery chargers: the direct connected D.C. ammeter, the meter mounted shunt type, and the external shunt type.
The direct connected D.C. ammeter, as shown in Figure 18-la, which has one or more turns of heavy wire in the meter, or the cable on the outside, indicating by induction. The full current goes through the meter to register the amperes. There is no adjustment on this type of ammeter, except a "zero" adjustment in some cases. The dial shows the amperes either in numbers on any of the three types, or by a scale marked in color to show the limits of maximum charge for each battery voltage.
The meter mounted shunt type is shown in Figure 18-lb.
The external shunt type is shown in Figure 18-1c. Both shunt types work on the same principle, and are adjustable by loosening the screw, and moving the connection to change the position of the meter on the shunt. The less metal between the meter terminals, the lower the reading with the same current through the shunt. In both cases, the main charger current goes through the shunt SH. The meter operates from the voltage drop across the shunt. This voltage drop is only a few thousandths of a volt, or millivolts MV. The meter is a millivoltmeter, but it is calibrated in amperes for a particular shunt. The external shunt type avoids running heavy cables to and from the meter. Only a very small wire is needed between the shunt and the meter. The shunt is usually mounted on a heavy stud, such as provided by the circuit breaker, solenoid, or rectifier. In Figures 18-1b and 18-1c, moving the shunt connection in the direction of I is for an increased meter reading, and D for a decreased meter reading.
Voltmeters
Occasionally, D.C. voltmeters connected across the battery charger output are used as charge indicators. When the voltage reaches approximately 13.8 volts for a 12 volt battery, it is considered to be fully charged without gassing at normal room temperatures. Two separate small leads go to the battery charger clips directly, to read the voltage at the battery terminals, avoiding error due to the voltage drop in the charging cable.
Meter Connections
D.C. voltmeters must be connected in parallel to the circuit, that is, positive terminal to positive terminal, and negative terminal to negative terminal. However, an ammeter is series connected so that the positive output of the charger goes to the positive meter terminal. The negative meter terminal would then go to the positive cable clamp. For a negative output charger, the negative output connects to the meter negative terminal, and the meter positive terminal connects to the negative cable clamp.
Usually, the left terminal, while facing the terminals on the back of the meter, is the positive connection on most voltmeters and ammeters.
The snap-on type of plastic meter covers are easy to replace, and often do need replacement. In cleaning plastic meter covers, use only soap or detergent and water. Never use alcohol or cleaning solvent. The cover can be pulled off with the fingers, and snapped back into position. Observe the position of the tabs on the cover and be sure they line up with the proper notches in the meter case. The cover will go on only one way correctly without using force.
Expanded Range D.C. Voltmeters
D.C. voltmeters are used in battery load testers, either as a separate test unit, or built into a combination battery charger and battery tester. The voltmeter leads go directly from voltmeter to the battery charger clips by separate leads to avoid erroneous readings due to the voltage drop in the heavy cables. A battery tester puts a resistance load across the battery being tested, and shows the voltage under load conditions as well as at no load, before and after charging.
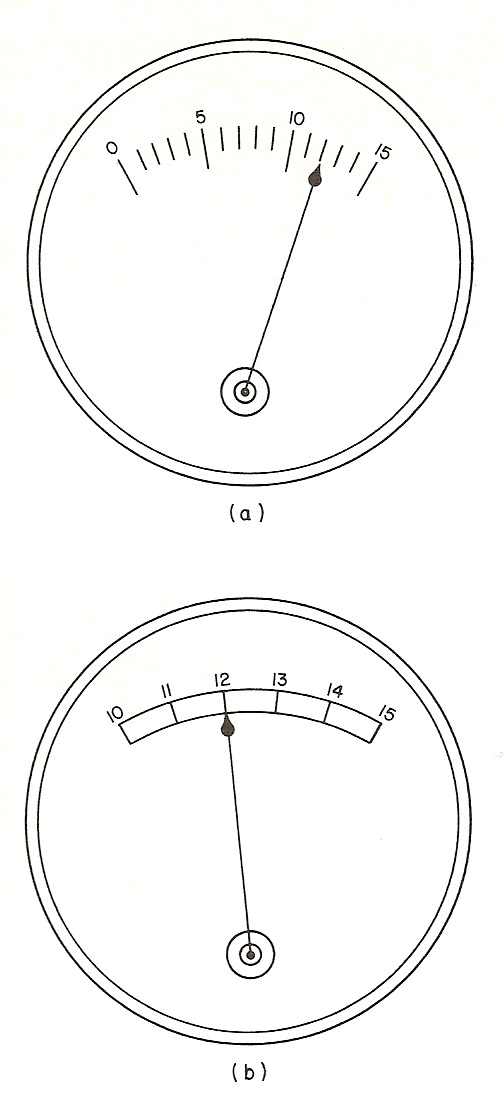
The D.C. voltmeter used to show the battery condition and state of charge on most late model testers is a special design known as an "expanded range" or "suppressed scale" D.C. voltmeter.
A standard voltmeter spreads the voltage from zero to full scale over the entire scale. For a 0-15 volt meter for example, the standard linear scale D.C. voltmeter is shown in Figure 18-2a. In battery testing (12 volt), voltages below 10 or above 15 (8-16 are common) are of no particular significance. In Figure 18-2a, the important voltage readings are on the upper third of the scale. The expanded range D.C. voltmeter shown in Figure 18-2b overcomes this disadvantage by expanding the scale 3 times, giving readings 3 times more accurate. The meter in Figure 18-2b does not start reading until the voltage reaches 10 volts.
This expansion may be done in several ways. A bridge circuit using special resistors, or lamp bulbs, is widely used. The bridge circuit is installed either inside the meter, or mounted on a plate external to the meter. In the earliest models of expanded range meters, the suppression was done by using the hair spring adjustment to hold the meter at the low end of the scale until the voltage of about 10 volts was reached. This method resulted in banging the needle against the stop every time the voltage was suddenly removed, often damaging or bending the needle, or causing inaccurate readings. So, these meters were, of necessity, highly damped to check the rebound.
Expanded Range D.C. Voltmeter Using Zener Diodes
The development of the zener diode provided a relatively inexpensive, accurate and simple means to expand the range on a D.C. voltmeter.
In Figure 18-3a, a 10-volt zener diode is shown connected in series with the voltmeter. The meter will get no current until the voltage reaches 10 volts and the zener diode starts conducting, holding a l0-volt voltage drop across it. As the voltage is increased, the zener diode Z has a constant voltage drop of 10 volts, regardless of the current through it, within limits. At a full scale reading of 15 volts, there is a 10-volt drop across the zener diode Z and 5 volts drop across the meter resistance. At a 10-volt reading, there is no voltage across the meter, and a 10-volt drop across the zener diode.
Figure 18-3b shows the same basic circuit, but for dual-voltage operation, such as 6 and 12 volts, uses two zeners. Zener diode Z1 takes 5 volts or less, and Z2 takes 10 volts or less. R1 is the multiplier and calibrating resistor for 6 volts ( 5V -7.5V range), and R2 is the multiplier and calibrating resistor for 12 volts (10V -15V range). Switch SW1 is a SPDT switch that selects either the 6 or 12 volt range. Slight deviations of Z1 and Z2 in value can be compensated for by rheostats R1 and R2. Z1 and Z2 should be exactly 5 or 10 volts, or less, but not over. If under, they will start conducting a little sooner.
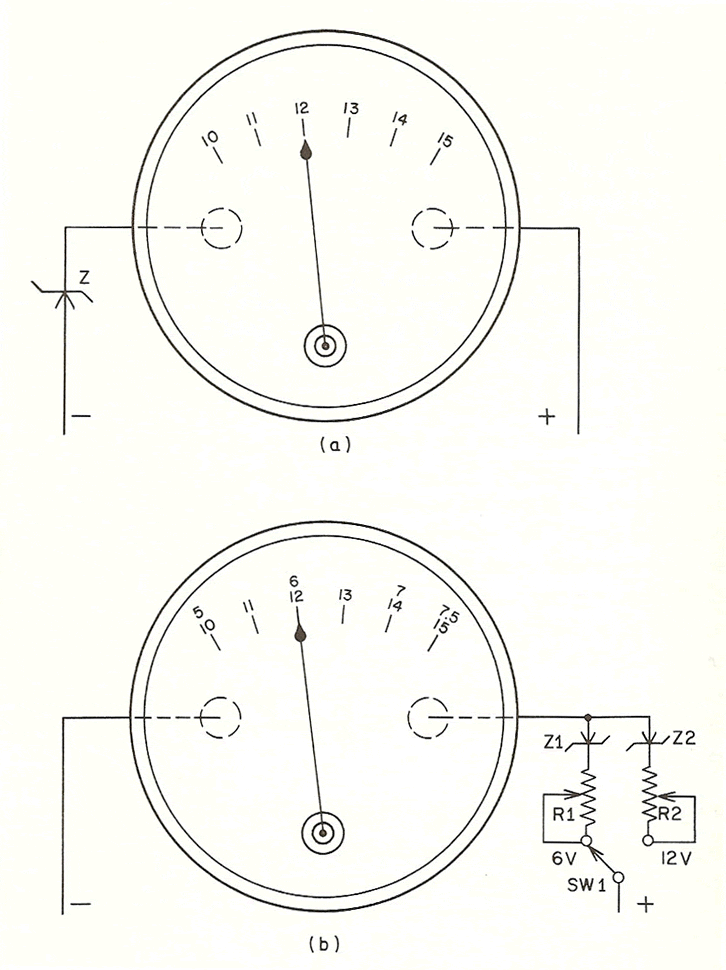
Sometimes a zener diode will be found connected across the meter terminals. Do not confuse that with the circuits of Figures 18-3a and 18-3b. A zener diode connected across the voltmeter terminals is placed there for "over-voltage" protection. The zener conducts and shorts the meter if the full scale voltage exceeds the safe limits.

Battery Load Tester
The battery load tester shown in Figure 18-4 provides a reading of battery voltage under no load, and at a predetermined amperage load on the battery can test 6 or 12 volt batteries. The D.C. voltmeter VM scale is usually calibrated in volts, and always has a colored scale to indicate battery condition and state of charge. It often has a colored scale for calibrating and adjusting voltage regulators on vehicles.
To use this tester,first set the battery voltage test switch, consisting of SW2 and SW3 ganged together as a DPDT switch, to either 6 volts or 12 volts. This selects the correct meter range on the test meter and connects the correct resistance load. When SW1 is set to test, this energizes solenoid RL1, closing the contacts and placing load resistor R1 across the battery. If test switches SW2 and SW3 are in the 12 volt position, solenoid RL2 is not energized, and only resistance R1 is connected across the battery for the 12 volt test. If test switch SW2 and SW3 is in the 6 volt position, solenoid RL2 closes the contacts, and connects load resistance R2 in parallel with load resistor R1 and across the battery. A 6 volt battery needs a higher load test current than a 12 volt battery.
Note that small wires from the test meter circuit go directly to the battery test clips to give accurate voltage readings at the battery terminals. This avoids error due to voltage drop in the cables. Used cables may have many broken strands and offer a higher resistance than a new cable. These small wires are usually built into the heavier cable, or they are taped to the outside of the battery test cables.
Rheostat R3 (25 ohms) is a calibrating resistor, and R4 (39 ohms) is a multiplier for 6 volts. Rheostat R5 (40 ohms) is a calibrating resistor, and R6 (100 ohms) is a multiplier for 12 volts.
Combination Charger and "421" Battery Tester
The battery tester shown in Figure 18-5 is a type "421" tester, and is more accurate and reliable than any previous equipment. It has a builtin 14 ampere battery charger for 12 volt batteries only. This tester has been specifically designed to perform the "421" battery test. This "421" test is the result of extensive testing and analysis of several thousand batteries of all sizes and brands, in various states of charge and condition.
The "421" test is based upon an analysis of differential open circuit terminal voltages. The terminal voltage is measured after the battery has been conditioned by a discharge of 50 amperes for a specific period of time of 15 seconds, and again after the battery has been conditioned by a charge of 14 amperes for a specific period of time of 45 seconds. The difference between these two readings is then compared to a standard colored meter scale to determine battery condition. The standard is based on voltage differences which are characteristic of good batteries and bad batteries. Testers that can do this "421" test can be recognized by the "421 TEST' seal appearing on the instrument panel.
Refer to Figure 18-5 and do the following procedure, which is printed on the front panel of the tester. Explanations have been introduced here, where appropriate, to further explain the use of each component at all stages of the test.
- 1. Check battery for visual defects, and add water if needed. CAUTION -all lights and accessories must be off.
- 2. Plug power lead into 115 volt outlet.
- 3. Connect the red clamp to the positive battery post and the black clamp to the negative post. Twist clamps to make good connection.
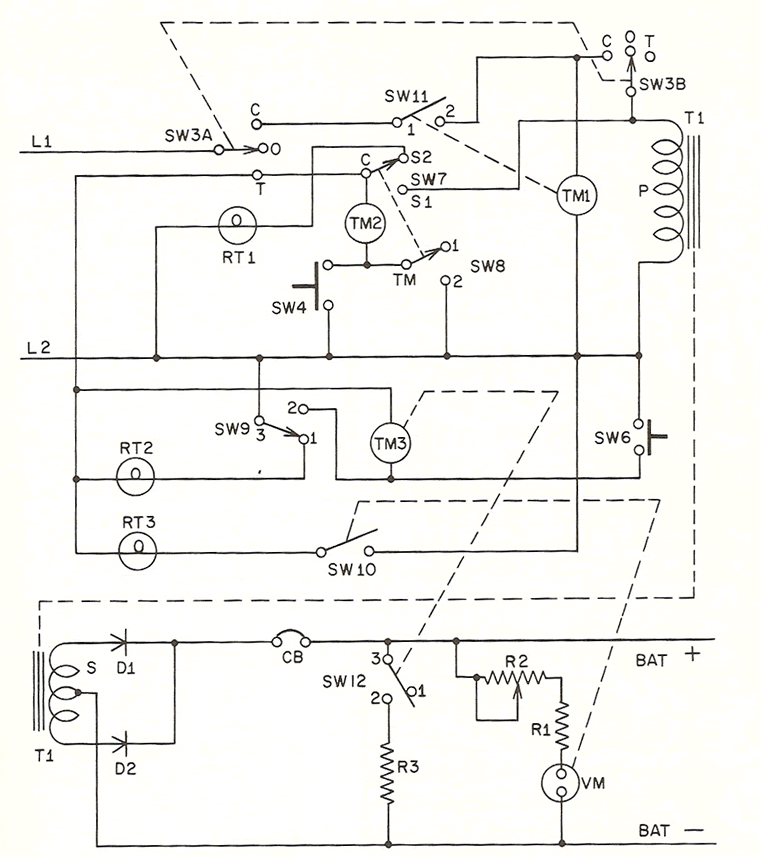
The "selector switch", SW3A and SW3B, selects the 421 "test", turns AC "off", or connects the tester as a regular battery charger "charge" at 14 amperes 12 volts. The "selector switch" is a DPDT toggle switch with a middle "off" position.
- 4. To test, move "selector switch" SW3 to the "test" position. Rotate "test indicator" on the meter (a small knob on the front of the meter) to "up" position. All three test lights, "set", "re-start" and "condition" should be "on". "Test indicator" (SW10) on the meter must be turned to "up" position so that "re-start" light RT3 goes on. Otherwise, the "re-start" light could not give an "off" indication in step 7. Switch SW10 is a microswitch mounted on the meter that closes turning on "re-start" light RT3 when the "test indicator" is set at over 11 volts on the meter scale. Switch SW10 is open and the "re-start" light RT3 is off when the "test indicator" is set below 11 volts on the meter scale.
- 5. Depress "set button" SW6, and hold it down until "set light" RT2 goes out. The "set button" SW6 closes the circuit connecting the load timer motor TM3 across the 115 V AC line. After a few seconds, switch SW9, which is a cam-operated switch driven by load timer motor TM3, moves movable contact 3 from contact 1 to contact 2, turning off the "set light" RT2, and connecting contact 3 to contact 2. This shunts the "set button" SW6, and keeps TM3 running, even after the "set button" SW6 is released. At the same time, load timer SW12 moves contact 3 from contact 1 to contact 2, placing the 50 ampere load resistor R3 across the battery for 15 seconds. If the "set button" is not held down until "set light" goes out, the timer and cycle will stop. Press and hold the "set button" until "set light" goes out. After the "set light" goes out, the 50 ampere load is applied for 15 seconds, after which it is turned off. The "set light" stays off for 5 seconds more while the battery voltage stabilizes. If the timer stays on and doesn't turn off the "set light" within a few seconds, immediately disconnect the batteries and check the cam on the load timer TM3. The load timer can "hang up" on the cam front and stall the timer motor leaving the load resistor connected across the battery. Usually, a small dab of grease on the steep part of the cam will cure this problem. If not, smooth off the cam to remove any burrs. The recommended grease is Molykote G lubricant. Run the tester through the load test cycle, with the batteries disconnected, as given in step 5, to be sure the timer is operating properly several times. Better yet, disconnect the timer motor TM3 leads and apply 88 volts through a Variac, potentiometer, or other adjustable A.C. source. If it operates for several minutes on 88 volts, it can be considered to be dependable on 115V AC. The torque at 88 volts is only 58½% of the torque at 115 volts. The torque varies, not proportionally, but with the square of the voltage.
The large contacts 2 and 3 of load timer switch SW12 and the load timer micro-switch SW9 are driven by load timer motor TM3 by two separate cams. After 20 seconds, timer TM3 returns the contacts of SW9 and SW12 to the original position as shown in Figure 18-5.
If the load timer should be left 'hung up" with the load resistor R3 still connected, do not try to charge the battery or to do step 7, because the extra load on the rectifiers would overload them or kick out the 30 ampere circuit breaker CB.
- 6. When "set light" comes on again, immediately rotate "test indicator" until it crosses the meter pointer at the "set line".
- 7. If "restart" light goes off, proceed to step 9. The "restart" light will not go off if setting of "test indicator" in step 6 was over 11 volts.
- 8. If "re-start" light stays on, repeat steps 5, 6, and 7. If "re-start" light stays on after repeating three times, proceed to step 9.
- 9. Depress "condition button" and hold it down until "condition" light goes off. "Condition button" SW4 operates condition timer TM2, starting a 14 ampere, 45 second charge cycle. Charge starts when "condition" light RT1 goes off and ends when "condition" light glows. When "condition button" SW 4 starts the condition timer motor TM2 after a few seconds, the timer drive cam switch SW7 moves contact C from contact S2 to contact S1. This disconnects "condition" light RT1 and it goes out. Contacts C and S1 apply 115 VAC to the primary of the transformer T1, and puts a 14 ampere charge on the battery through silicon diodes D1 and D2 in a conventional center-tapped, full-wave charger circuit. At the same time, the condition timer motor operates switch SW8 by moving contact TM from contact 1 to contact 2, shunting "condition button" switch SW4. Motor TM2 will continue to run through the cycle, even after "condition button" switch SW4 is released. SW4 can be released as soon as, but not before, "condition" light RT1 goes out. The condition timer motor runs for 45 seconds and then it shuts off, stopping the charging cycle by moving contact C away from S1 half-way between S1 and S2. The condition timer motor continues to run for an additional 15 seconds to stabilize the voltage. Then, SW8 shifts movable contact TM from contact 2 to contact 1, stopping the motor TM when movable contact C of SW7 moves to contact S2, turning on the "condition" light RT1.
- 10. When "condition" light glows again (in about 1 minute), immediately note where the meter pointer crosses "test indicator" line. Reading in left red area indicates low voltage after charge due to a possible short in the battery.
Reading in right red area indicates high voltage after charge due to sulphation or high battery resistance. Reading in the green area indicates a good battery. If recharging is necessary, the approximate charge time in hours can be read.
- 11. If in either red area replace battery. If in the green area battery is "OK"; recharge number of hours shown on upper scale.
Battery charge procedure
- 1. With the selector switch in "off" position, connect cable clamps to battery with correct polarity. Move selector switch to "test" position and all three lights should glow before switching to charge. Move the selector switch to "charge" position.
- 2. Set "charge timer" TM1 to desired number of hours.
In Figure 18-5, the 12 hour timer switch SW11 is a cam-operated switch driven by "charge timer" motor TM1. When the charge timer dial is turned clockwise, it closes contacts 1 and 2, connects charge timer motor TM1 and transformer T1 primary across the 115 V AC line, and continues to run the number of hours set on the dial. This provides a 14 ampere (at start), 12 volt charge to the battery. The test voltmeter VM can be calibrated to read the exact voltage across the cable clamps, with the "selector switch" at the "off" position, by adjusting rheostat R2 which is located inside the case and has a screwdriver slot in a stub shaft. Of course, a precision ½% voltmeter should be used to calibrate the meter VM. However, fairly accurate results can be obtained by using a fully charged battery that has stabilized for 24 hours after charge without an additional charge or discharge during the 24 hour period. At 77 degrees F., the battery should have a voltage of 2.1 volts per cell, or 12.6 volts for a 12 volt battery. If the meter VM on the tester is fairly close, leave it as it is. If the test meter is far off, adjust rheostat R2 to read exactly 12.6 volts on meter VM.
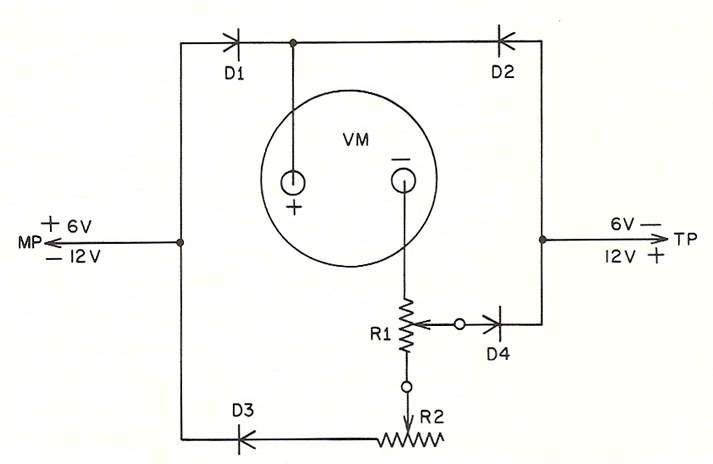
Simple Hand-Held Battery Tester
Figure 18-6 shows a small hand-held voltmeter used to test battery voltage under starter load, as well as for setting voltage regulators on vehicles. This tester is unusual because it does not use a switch to read 6 or 12 volts. Just reverse the connections. There is a meter prod MP protruding from the case of the meter and a test prod TP at the end of a flexible cable. To read on the 6 volt scale, connect the meter prod MP to the battery positive post and the test prod TP to the battery negative post. On the 6 volt scale, the current flows through the meter prod MP and silicon diode D1, but is blocked by diode D3 and D2, through the positive meter VM terminal, through 6 volt multiplier potentiometer R1, and through diode D4 to the test prod TP, and back to the battery negative post. To read on the 12 volt scale, reverse the prod connections used above. The test prod TP is connected to the positive battery post and the meter prod MP is connected to the negative battery post. On the 12 volt scale, the current flows through the test prod TP, through diode D2 (D4 and D1 are blocking), through the positive meter terminal through R1, R2 and D3 back to the negative battery post through meter prod MP.
Diodes D1, D2, D3, and D4 are all silicon diodes rated at 500 MA, 50 PIV or higher.
Potentiometer R1 is the 6 volt calibrating resistor (50 ohms). It should be adjusted first in case there is a small reverse leakage in diode D4. Rheostat R2 is the 12 volt calibrating resistor (100 ohms).
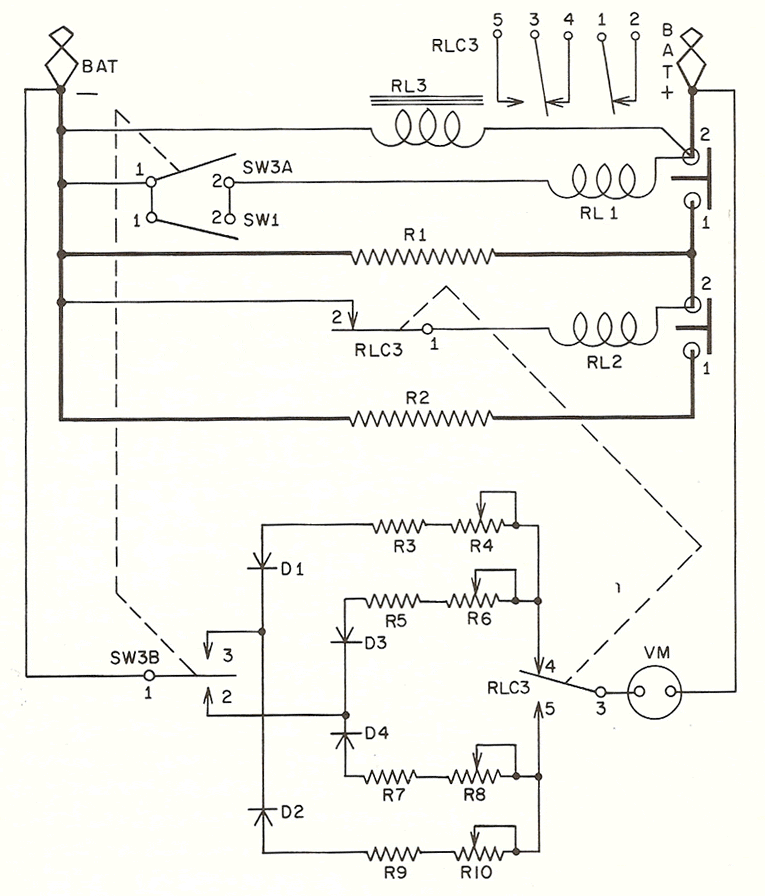
Battery Condition Tester
Figure 18-7 shows a battery condition tester having a timed load of 250 amperes at 6 volts, 180 amperes at 12 volts, an expanded scale meter, and an automatic 6-12 volt selector relay RL3.
The 6-12 volt relay RL3 has a set of double contacts 1 and 2, and a set of triple contacts 3, 4, and 5. With the coil of RL3 de-energized, or on 6 volts, the contacts remain in the 6 volt position as shown. However, 12 volts will energize the armature and move contact 1 away from contact 2, and contact 3 away from contact 4 to contact 5, thereby setting the load and meter to the 12 volt range. Solenoid RL1 closes during the "battery condition" or load test for both 6 and 12 volts, through either the timer TM contacts SW1 contacts 1 and 2, or by "battery condition" switch SW3A contacts 1 and 2, or both. This connects the 180 ampere discharge resistor R1 across the battery. For 6 volts, switch RLC3 connects contact 1 and 2, energizing solenoid RL2 and placing discharge resistor R2 in parallel with R1 and across the battery for the higher 250 ampere load on 6 volts.
The "state of charge" and "battery condition" switch SW3A and SW3B is a DPDT switch. When in the "state of charge" position, contacts 1 and 3 of SW3B are closed placing the voltmeter VM across the line for "state of charge" and "open circuit" readings. The "battery condition" position closes contacts 1 and 2 of SW3A, energizing the discharge solenoids, and contacts 1 and 2 of SW3B energizing the test meter VM through a lower resistance multiplier network so that the condition voltage will rise higher on the scale. This is an expanded range meter. The four silicon diodes D1, D2, D3, and D4 are similar and are used to simplify the mechanical switching of the voltage multiplier circuits of the voltmeter. They are automatic switches. For example, on the 6 volt open circuit and "state of charge" position, the current flows from the positive cable clamp
through the meter, switch RLC3 contacts 3 and 4, through R4 (25 ohms), R3 (33 ohms), diode D1, through contacts 3 and 1 of SW3B, and back to negative (D2 blocks current). On the 6 volt "battery condition" position, the current flows from the positive cable clamp through the meter, RLC3 contacts 3 and 4, through R6 (25 ohms), R5 (18 ohms), D3, SW3B contacts 1 and 2, and back to the negative cable clamp. On the 12 volt "state of charge" or open circuit position, the current flows from the positive battery clamp, through the meter, through RLC3 contacts 3 and 5, through R10 (40 ohms), R9 (100 ohms), D2, switch SW3B contacts 3 and 1, and back to the negative battery clamp. On the 12 volt "battery condition" position, the current flows from the positive battery clamp, through the meter, RLC3 contacts 3 and 5, R8 (40 ohms), R7 (75 ohms) D4, SW3B contacts 2 and 1, and back to the negative battery clamp.
The test procedure, and interpretations of the readings, are printed on the front of the panel.
Solenoids RL1 and RL2 are 6 volt intermittent duty units, but will stand 12 volts for the few seconds they are energized.
Battery Overall Tester
Figure 18-8 shows the schematic of a battery universal tester. This universal tester can do a number of different battery tests.
The various test procedures found printed on the front panel of the tester, are as follows:
TEST # 1 BATTERY CHARGE
Set "car battery" switch SW1, A, B, C, and D, to type of car (6V, 12 volt compact or 12 volt standard). When contact 4 of each of the switches SW1, A, B, C, and D is set on contact 1, the circuit is set up for 6 volt batteries; when set on contact 2, the circuit is set up for 12 volt compact car batteries; and when set on contact 3, the circuit is set up for 12 volt higher capacity standard car batteries.
Connect red clamp to positive battery post, and black clamp to negative battery post.
Depress load switch SW2, A and B for 15 seconds to remove the surface charge. If switch SW1, A and B are in the # 1 position for 6 volts, solenoid RL1 and RL2 are energized, and discharge resistors R1 and R2 are connected across the battery in parallel at 165 amperes load. With the switch SW1, A, and B in #2 position, only solenoid RL1 is energized connecting load resistor R1 across the battery placing a load of 150 amperes on 12 volt compact car batteries. With the switch SW1, A and B in the #3 position, only solenoid RL2 is energized, placing discharge resistor R2 across the battery at 180 amperes for standard size 12 volt car batteries. Meanwhile, switch SW1, C and D connects the test meter through series resistors across the battery.
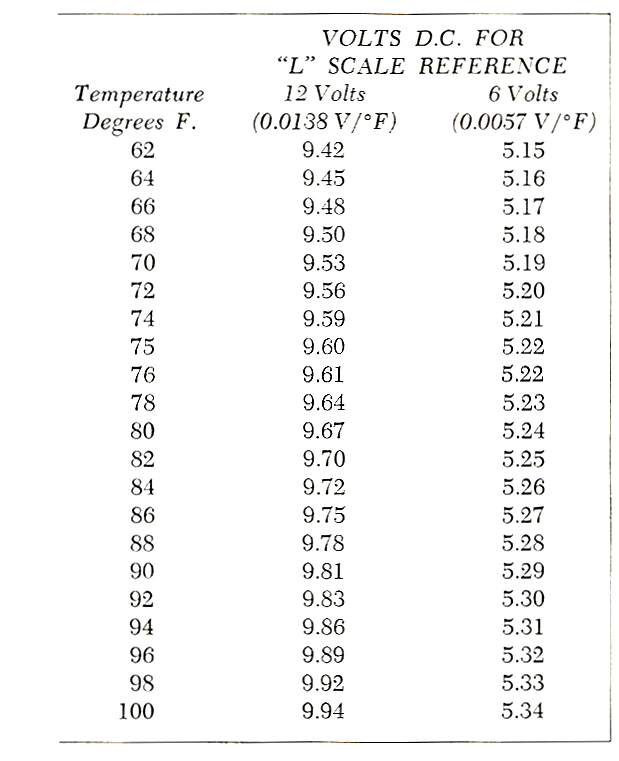
In position # 1 (6V), SW1D connects the positive clamp through contact 4 of SW1D and contact 1, through R4A (32 ohms), R3 (8 ohms), R10 (see Table 18-2) red to white, through contacts 1 and 3 of SW2B, through the test meter, and back to the negative clamp. A zener diode Z is placed across the test meter to protect against reverse polarity and transient voltages above 16 volts. R10 is a temperature compensating probe, consisting of a sealed spool of nickel wire whose resistance changes with the temperature of the electrolyte in the battery. This probe must be placed in any cell, during the load test only. This probe changes the calibration of the load scale, depending on its temperature. It is not in the circuit during the open circuit test. Refer to Table 18-2 for temperature-resistance values.
On positions #2 and #3, switch SW1D connects the positive clamp to contact 4 with 2 and 3, through R4B (90 ohms), R5 (25 ohms), R10 black to white, through SW2B contacts 1 and 3, test meter, and back to the negative clamp.
Depress load switch for 15 seconds to remove surface charge. While battery voltage is settling, then, remove vent caps and check water level.
Read center ''battery charge'' scale. For a red area reading, recharge battery. For a green area reading, charge O.K.
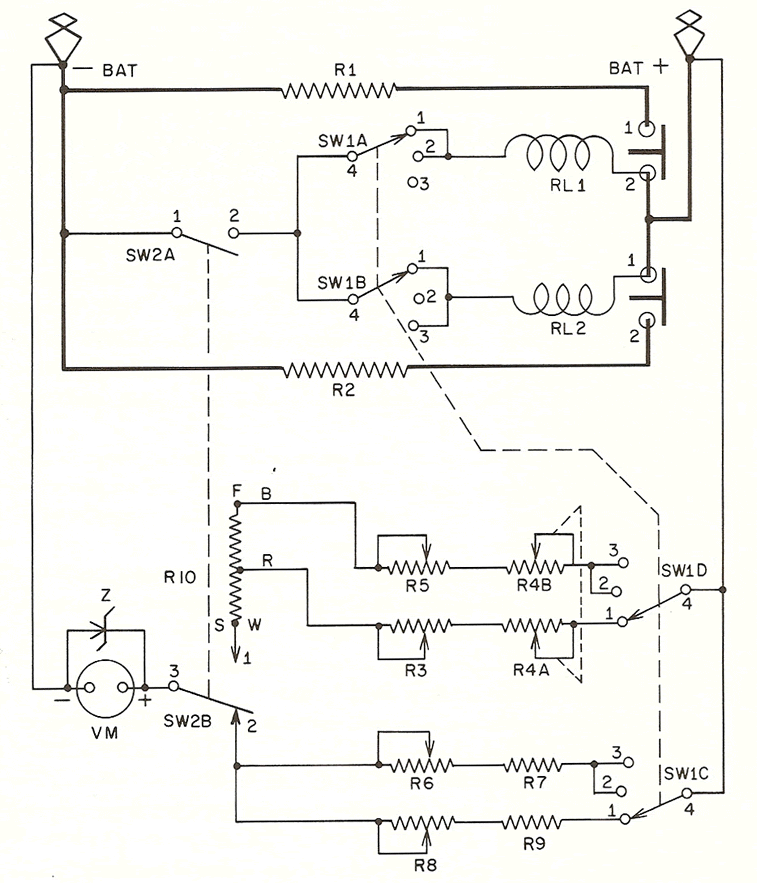
TEST #2 BATTERY CONDITION.
NOTE: Do this test only if test #1 indicates 25% or more charge in battery. If less than 25% charge, recharge battery, then perform #2 test.
Insert temperature compensating probe R10 into any cell of the battery to compensate for temperature of electrolyte.
Connect red clamp to positive battery terminal and black clamp to negative battery terminal.
Set car battery test switch SW1, A, B, C, and D as in test # 1.
Set "percent charge" switch (indicator) to reading (25% or more) Obtained in test # 1.
Depress ''load switch" and read lower center "battery condition" scale while depressing "load switch".
Set "percent charge" switch (indicator) to "after charge" arrow, if battery has been fully charged. If red area reading, replace battery. If green area reading, battery is O.K.
TEST #3 CHARGING SYSTEM UPPER RIGHT SCALE
For all fully charged batteries, set battery switch SW1 as in test #1 and #2. Connect red clamp to positive, and black clamp to negative battery posts. Turn all electrical accessories off. Warm up engine, and operate at fast idle for 5 minutes. Then, with car still at fast idle, read upper right hand scale.
Red High indicates that the voltage regulator needs adjusting to prevent overcharging and boiling, or other damage to the battery.
Green OK indicates that the alternator, or generator, and voltage regulator are O.K.
Red Low indicates that the fan belt is slipping, or the alternator, or generator, or regulator are faulty.
Check the fan belt first. Check generators by disconnecting the field (F) lead at the regulator, and touching the disconnected wire, first to ground, then to the terminal on the regulator marked "GEN" or "ARM".
Check alternators by disconnecting the field (F) lead at the regulator, and touching the disconnected wire to the "IGN" or "SW" terminal on the regulator.
If the above generator/alternator tests result in a Green OK or Red High reading, replace the regulator. If not, replace the generator or alternator.
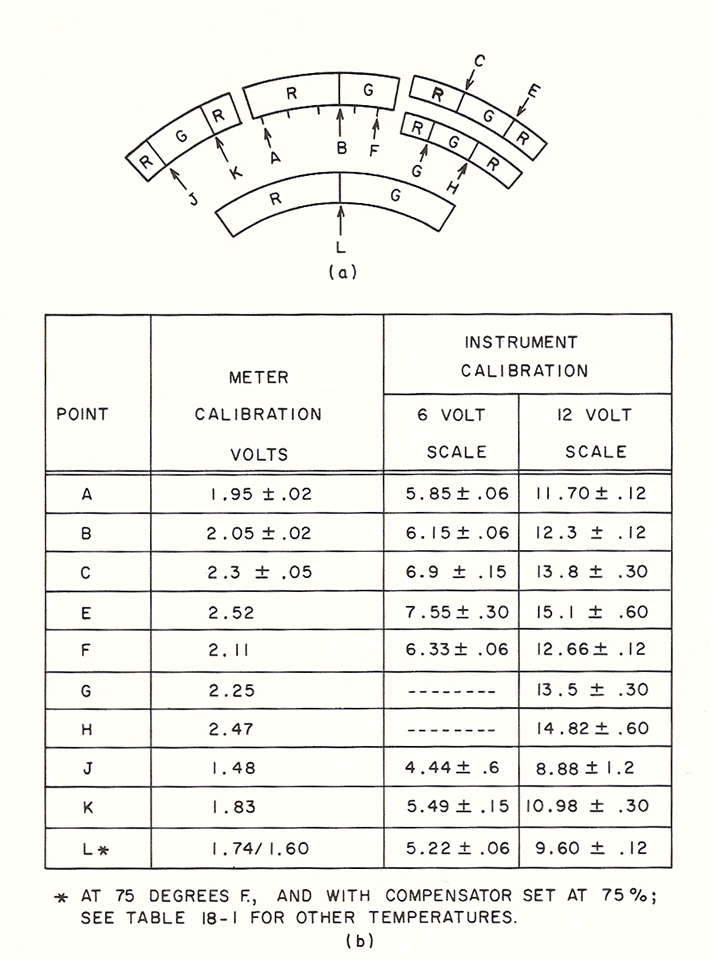
To check or calibrate the meter, refer to Figure 18-9b for the correct voltage, with tolerances, at check points shown in Figure 18-9a.
TEST #4 STARTER. Battery must be fully charged.
Set "battery switch" for correct battery voltage (6V or 12V).
Connect red clamp to positive, and black clamp to negative battery posts. Turn all electrical accessories off.
Crank engine with remote starter button, leaving ignition key off.
Engine may be cranked with the key or car starter button, but the center wire should be removed from the ignition coil to prevent the engine from starting.
Red Low indicates bad bearings or defective armature in starter motor. Green indicates that starter is OK.
Red High indicates worn brushes, loose connections, or bad cables.
TEST #5 SHORT OR LEAKAGE IN CAR'S ELECTRICAL SYSTEM.
Turn off all accessories.
Remove ground cable from battery. Set battery switch for correct battery voltage (6V or 12V).
For cars with a negative ground, connect black test clamp to the negative battery post, and the red clamp to the ground cable or to the engine block.
For cars with positive ground, reverse above connections; that is, connect the red test clamp to positive battery post, and the black clamp to ground cable, or engine block.
Any reading at all indicates a drain on the battery. Touch ground cable to its battery post to wind the electric clock, if any.
Calibration—Model 260N, Load Circuit Only
Then, if the meter continues to read, there is a short or leak in the car's electrical system.
When checking systems for shorts or leakage, leave the meter con-nected to indicate when fault is located.
In tests 3, 4, and 5, the test meter is connected and used on the O.C. (open circuit) connection, and meter multiplier resistors R6 (40 ohms), R7 (100 ohms), R8 (25 ohms), and R9 (39 ohms) are in the circuit. When the load switch is depressed, the voltage drops. To raise the meter pointer on the scale, lower multiplier resistors R3 (8 ohms), R4A (32 ohms), R4B (90 ohms), R5 (25 ohms), and R10 (only used on load test) are used. Resistance values for R10 are shown in Table 18-2 for various temperatures.
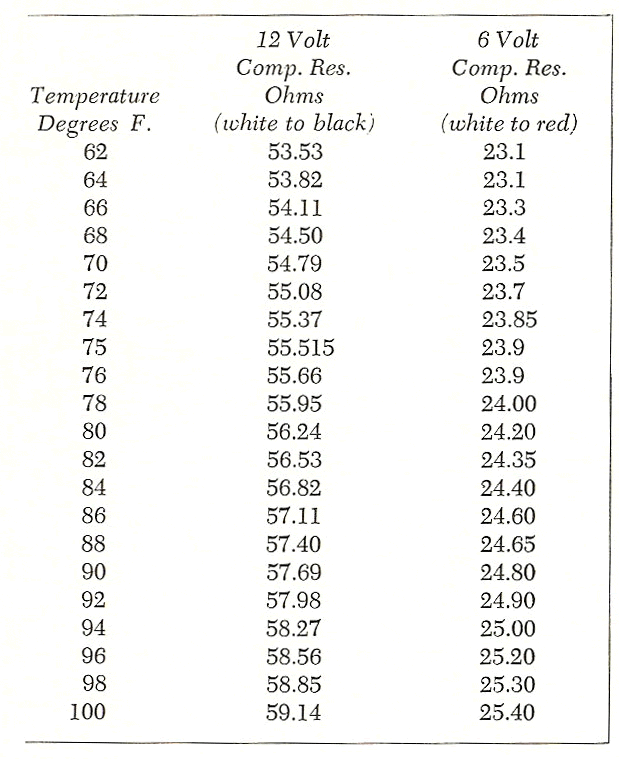
Figure 18-9a shows the expanded range meter scale, and Figure 18-9b shows the calibration voltages for the test points indicated. Table 18-1 shows the calibration of the "L" scale for various temperatures, and Table 18-2 shows the resistance values of RIO for various temperatures. All of the above figures and tables apply to schematic of Figure 18-8.
BATTERY LOAD AND CELL TESTER
Figure 18-10 shows a battery tester having two prods PR1 and PR2 to read individual cell voltages on all but hard-top batteries.
The prods measure the voltage of one cell at a time, or on the car starter load test, or open circuit, or charging test. All cells should read the same voltage. A low, or high, reading indicates a bad cell. Nominal open circuit (unloaded) voltage should be about 2-2.1 volts per cell. Do not attempt to use the prods while the large clamps are connected